Friday, December 30, 2011

World First YouTube 60fps footage © 2011

(or)

YouTube Goes Nuts with 2160i
(cross converted from 1080p60)

For now, it's just 15 seconds:


How to view 60fps:
  1. Download the 4K version
  2. Play in VLC using "Linear" deinterlacing filter.
  3. Set size to "half" or play full-screen.
VLC being VLC, you'll have to muck around with getting playback to kickoff again once you've forced deinterlacing to activate.


In the next few weeks I'll be uploading the rest of the footage.

This will push the new upload limit of 20GB.

It will create a 4K download of 40GB though …
YouTube's own encodings are typically twice the file size and half the quality.

Monday, December 26, 2011

Undoing the Fisheye lens

Needed to shoot with maximum field of view?
But now have black vignetting to dispose of?

You already know you can crop it, but that's the whole point of why you did this Google search;
you were looking for a way to avoid losing that field of view.

There are plenty of ways to do this wrongly:
  • Turn on the Fisheye filter and bring it to a little bit negative.
    (It does very little doesn't really bring in the edges anyway).
  • Turn on the Fisheye filter and bring it to a massive negative.  Max radius.
    (You get point-pinching — very noticeable in motion when items cross it, especially a light pole).
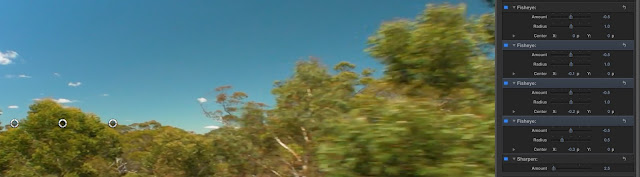
  • Turn on lots of little Fisheye filters and line them up in a row.
    Equal spacing along the horizontal axis.  Set to very little, e.g. "-0.5" each.
No.  Stop it.  Stop!

Besides being very tedious, that last one has a silent killer:  You lose resolution.
After approximately 2 or 3 filters end-to-end, Fisheye sucks the life out of your HD.

But other than that, the effect is starting to achieve something remarkable:
The edges are coming in as if the anti-Fisheye effect were set very high;
it is the same as setting to the sum of the filter values.  Just without the pinching!

But unless you want to upload your video as 480p (and waste a lot of setup time),
you really need a one-step filter that doesn't blur your picture.

(Plus you probably have a gut-instinct that concatenating filters was wrong).

Do this instead:
  • "Bulge" filter set to maximum in reverse.  Export to Final Cut Effect.
Note on the left pane:  First choose "supertab" Inspector, before looking for the Filters tab. 


The key to this is to shell out $50 for Motion.
And to have lots of patience with its spinning cursor.  Unbelievable!

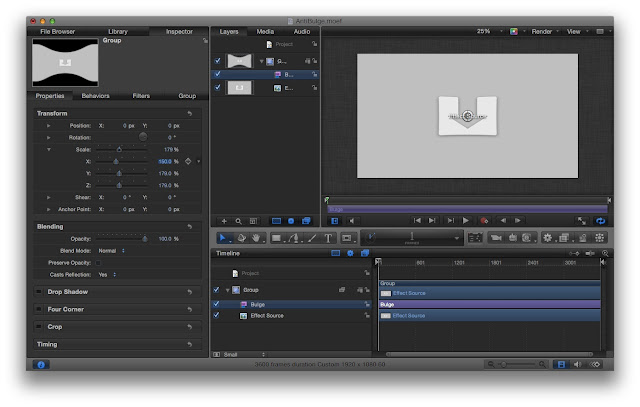
Inspector —> Properties —> Scale.  Try 179% for vertical, and something less for horizontal
(undershoot if you need to rotate later).


Once you "save" the project, it automagically appears in your FCPX filters list.
(I call him, "AntiBulge"!)

You can change and re-save, and the changes take effect only after deleting and re-applying in FCPX.

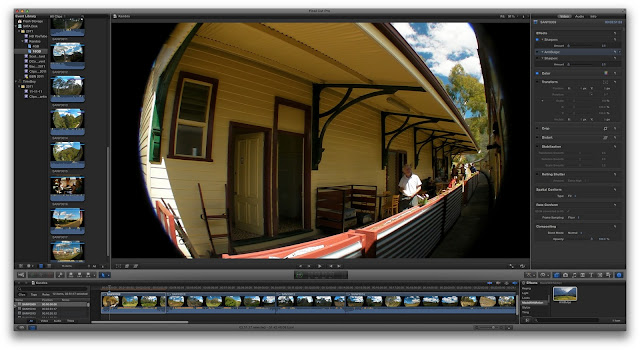
Now you can see the result, which is phenomenal:
Before
After … add x-axis scaling to suit taste

You can see it really pulled those corner details out of thin air … in fact, it's going at it so hard on the bottom left that you can even make out the (blue) colour bias that occurs due to chroma misregistration at very high resolutions on small-to-medium lenses.

I've left some of the vignetting in to allow for rotation correction (& cropping) but you can see how much you'd save compared to the original — line up with your eye, the left edge necessary to crop on the "After" image, and see how far you've really come in on the original?  Hardly anything at all.


If you turn off the scale & crop on the Motion side of things completely, you'll see everything gently pushed through the centre with a telltale "bubblegum" squeeze.  This is the natural counterpart to the fisheye lens.  If you play any motion video through that effect, including tilting and panning, you will see that this is the true counterpart;  not the Fisheye filter set to negative.

Sunday, December 11, 2011

A Pixel Is a Point Sample

A Pixel Is Not a Little Square (and other memos):

http://alvyray.com/Memos/MemosCG.htm#PixelIsNotSquare
Click on 'download' to get the PDF.

Precis:  It is a point sample.  Important if you want to upscale or downscale (I'm looking at you, Sky News Multiview).

Monday, October 3, 2011

Single-camera slowmo cutaways in FCPX

So you want to replace a bit of hasty panning with slow-motion of the cutaway angle?
Keeping the audio track intact and using a bit of classy motion flow, eh?

But you've got FCPX ... so instead you're getting ...

  1. Stabilisation refusing to turn on — you were wanting to use that, right?
  2. Audio timeline collapsing when you don't want it

The trick is to do everything in this order:

Cut Primary  Stabilise  Delete Audio  Fill Audio  Trim Cutaway

1.  Go blade cutting at the maximum extent of your primary angle.
     (worry about trimming the cutaway footage later)

2.  Turn on Stabilisation for cutaway angle.
     FCPX won't allow dominant motion analysis after step 3:
     If you delete your audio track first, a bug prevents DMA.

3.  Separate, then split off audio track of cutaway angle.

4.  Delete cutaway audio;  then extend (de-trim) previous audio track.
     Extend it to the start of the next audio track.
     This provides a reliable anchor in the new FCPX paradigm.

5.  Temporarily disable Stabilisation if required.

6.  Now apply re-speed and trim your cutaway angle.  Rinse & repeat.
     Using opt-[ and opt-] is generally the most fun way to go about trimming.

     The de-trimmed audio track will keep a hold of your endpoint.

7.  Turn on Motion Flow and reactivate Stabilisation as necessary.


Interestingly ... you may find that Motion Flow does a better job at Stabilising
all by itself.  After all, a wobbly camera is less wobbly at 25% rate.  I've never
seen a handheld video at 240fps that looks like it needs a tripod or steadicam.

H.264 workflow: Flawless 1080i to 1080p with JES

OK, so you've got some 1080i60 footage in H.264.

Freaking out because:
  1. Final Cut is showing just black
  2. QT Player X is showing just black
  3. QT Player 7 re-export is showing jitter: 1-in-60 fields out of place in the timeline
You're starting to regret not shooting 1280x720p60, because it's such a pain in the arts.

Never fear — just skip over the running waters with these 4 stones:

1.  Convert from ersatz 1080p60 to an "embedded 60i" 30fps movie:
     — export with QTP7 not QTPX
     — enforce 29.97fps
     — use H.264* with high bitrate / low crunch
     This gets a better result than the QuickTime 7.5.5 hack to allow 1080i compatibility
     (a crude 100% threading in-playback filter, changing dominance EVERY frame).

     * you could use intra (pixlet/AIC/prores) but it's a once-use-only intermediate.
     Plus, bypass another colourspace transform (funnily enough, with Apple's codec).

     QuickTime Player 7.5.5+ tells you H.264 1080i60 is 1080p60, by faking it.

2.  Check your "30p" movie has true interlacing, NOT field doubling:
     — open file in QuickTime Player and view in Original Size (Cmd-1)
     — skim forward to a frame with no global motion, and some horizontal edges
     — look for any staircasing, effectively 540p not 1080p

     If you find problems, repeat step 1 but remove a frame from the source.
     Delete one or three or five frames ("60p" ersatz) from the original & save a copy.


3.  Convert to 1920x1080p60 using JES Deinterlacer:
     — input = NOT progressive, top field first*
     — enforce 59.94fps
     — enforce 1080 lines, 1920 width in 'custom' under Standards Conversion
     — slide open that Inspector, and select NTSC and 'Video' range
     — video output 'Direct' to Apple Intermediate Codec
* you may have to switch TFF to BFF if you've been trimming

I've seen all sorts of problems with colour shifting, if you select "HD" instead of "NTSC";  brilliant green dresses become dull or turquoise, and skin tones lose their pink blushing highlights.

Living in a PAL world I still see the occasional problem with NTSC colourspaces looking dull on TV, but things have improved a lot since the big shift of 2009.  The only persistent offenders now are ESPN 1&2 HD and SD, which continues to insist on heavier shadows and a brown/purple bias on PAL displays and HDTVs in PAL land.

4.  Check your original / target with an overlay test:
     — open both files on the same frame in QuickTime Player
     — slide windows exactly over the same space
     — use Cmd-` (command-backtick) to repeatedly switch

Bright areas unequal are a likely sign that gamma values are wrong.
Dark areas unequal are a likely sign that NTSC/HD colourspace wrongly selected.

In a previous project I found I had to use 'Use Separate Gamma' with values of 2.11 and/or 2.12.  If brighter areas are mismatching, try this.  (I think I may have been using JES for step 1 as well as step 3).